前回はTCP/IPクライアントについて学びました。
今回はTCP/IPサーバを学びましょう。
コード
/**********************************************************************
  Filename    : WiFi Server
  Description : Use ESP32's WiFi server feature to wait for other WiFi devices to connect.
                And communicate with them once a connection has been established.
  Auther      : www.freenove.com
  Modification: 2022/10/31
**********************************************************************/
#include <WiFi.h>

#define port 80
const char *ssid_Router      = "********";  //input your wifi name
const char *password_Router  = "********";  //input your wifi passwords
WiFiServer  server(port);

void setup()
{
    Serial.begin(115200);
    Serial.printf("\nConnecting to ");
    Serial.println(ssid_Router);
    WiFi.disconnect();
    WiFi.begin(ssid_Router, password_Router);
    delay(1000);
    while (WiFi.status() != WL_CONNECTED) {
        delay(500);
        Serial.print(".");
    }
    Serial.println("");
    Serial.println("WiFi connected.");
    Serial.print("IP address: ");
    Serial.println(WiFi.localIP());
    Serial.printf("IP port: %d\n",port);
    server.begin(port);
    WiFi.setAutoConnect(true);
    WiFi.setAutoReconnect(true);
}

void loop(){
 WiFiClient client = server.available();            // listen for incoming clients
  if (client) {                                     // if you get a client,
    Serial.println("Client connected.");
    while (client.connected()) {                    // loop while the client's connected
      if (client.available()) {                     // if there's bytes to read from the client,
        Serial.println(client.readStringUntil('\n')); // print it out the serial monitor
        while(client.read()>0);                     // clear the wifi receive area cache
      }
      if(Serial.available()){                       // if there's bytes to read from the serial monitor,
        client.print(Serial.readStringUntil('\n')); // print it out the client.
        while(Serial.read()>0);                     // clear the wifi receive area cache
      }
    }
    client.stop();                                  // stop the client connecting.
    Serial.println("Client Disconnected.");
  }
}
11~12行目は各自の環境に合わせて設定してください。
動作確認
コードをコンパイルしてESP32-S3 WROOMボードにアップロードし、シリアルモニターを開きボーレートを115200に設定します。ESP32-S3をサーバーモードに設定して、同じLAN上の他のデバイスからの接続を待ちます。デバイスがサーバーに正常に接続されると、相互にメッセージを送信することができます。
ESP32-S3がルーターに接続できない場合は、リセットボタンを押し、ESP32-S3が再起動するのを待ちます。
ルーターに接続すると、シリアルモニターに自身のIPアドレスが出力されます。
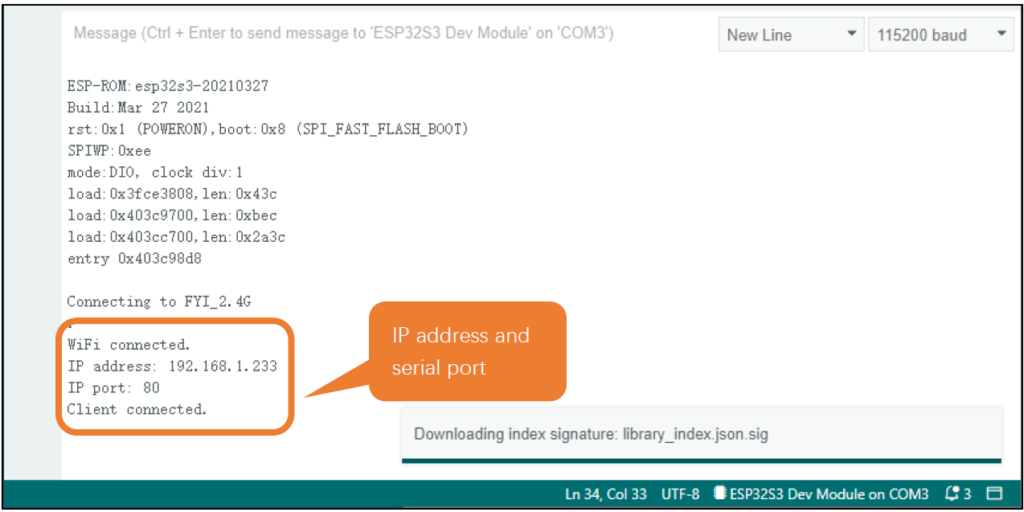
このIPを控えておき、sketchWiFiの画面に戻ります。sketchWiFiについては前回の記事を参考にしてください。
今度は『TCP CLIENT』を選択してください。
『REMOTE IP』に先程控えたIPアドレスを入力して『CONNECT SERVER』の左側のボタンを押します。
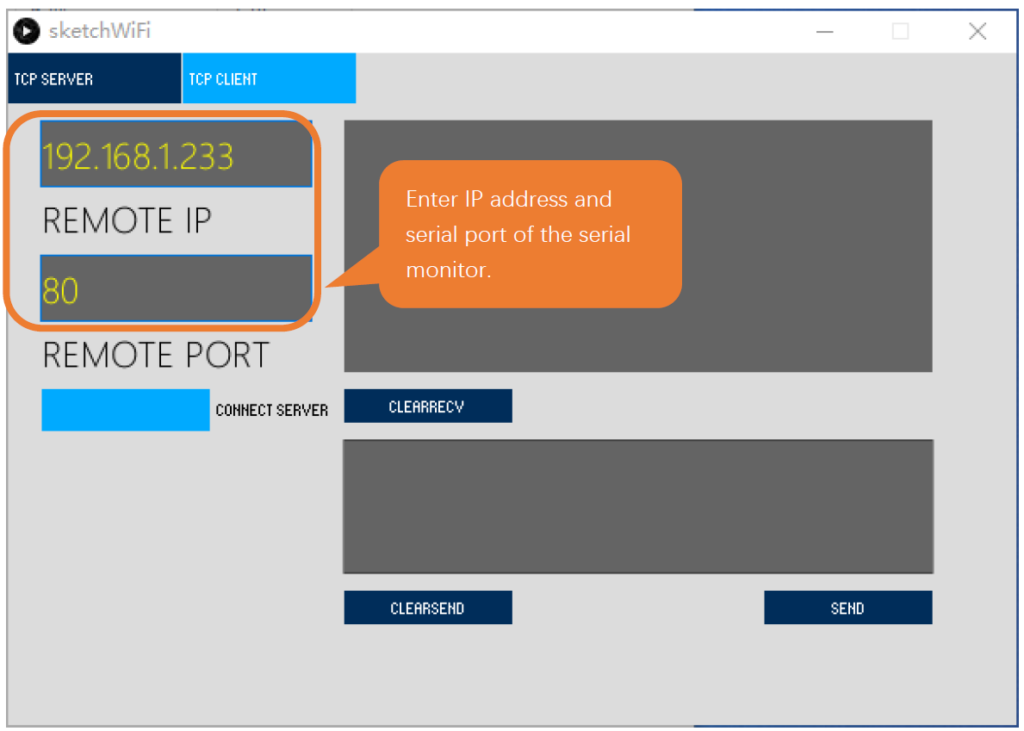
接続するとシリアルモニターに『Client connected.』と表示されます。
続いて送信ボックスに適当な文字(例えばHello World!など)を入力して、『SEND』ボタンを押します。
すると、シリアルモニターに送信した文字が表示されます。
コード解説
38行目でクライアントオブジェクトを作ります。クライアントオブジェクトが作成できたらclientにTrueが入ります。
 WiFiClient client = server.available();            // listen for incoming clients
  if (client) {                                     // if you get a client,
    Serial.println("Client connected.");
41行目でクライアントからの接続を待ち受けます。接続があるまでwhileでループします。接続があれば、クライアントからの文字列を読み取ってシリアル出力します。
46行目でシリアルモニターからの入力があれば、クライアントに送信します。
    while (client.connected()) {                    // loop while the client's connected
      if (client.available()) {                     // if there's bytes to read from the client,
        Serial.println(client.readStringUntil('\n')); // print it out the serial monitor
        while(client.read()>0);                     // clear the wifi receive area cache
      }
      if(Serial.available()){                       // if there's bytes to read from the serial monitor,
        client.print(Serial.readStringUntil('\n')); // print it out the client.
        while(Serial.read()>0);                     // clear the wifi receive area cache
      }
    }
次回はWebカメラを作成してみましょう。



コメント