前回は温湿度計の使い方を学びました。
非営利団体 金重総合研究所 - 知...
Project 24.1 温湿度計/Hygrothermograph - 非営利団体 金重総合研究所
前回は赤外線リモコンでLEDの明るさを制御してみました。 湿度計は、私たちの生活の中で温度と湿度を測定する重要
今回は温湿度計の測定値をLCDディスプレイに表示してみましょう!
目次
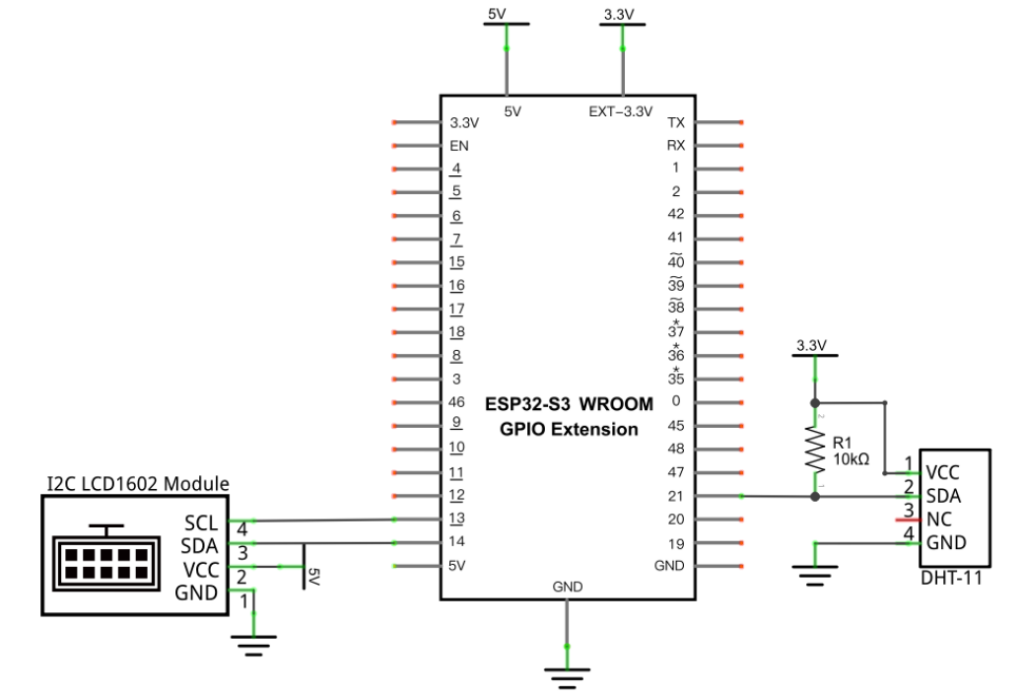
回路図
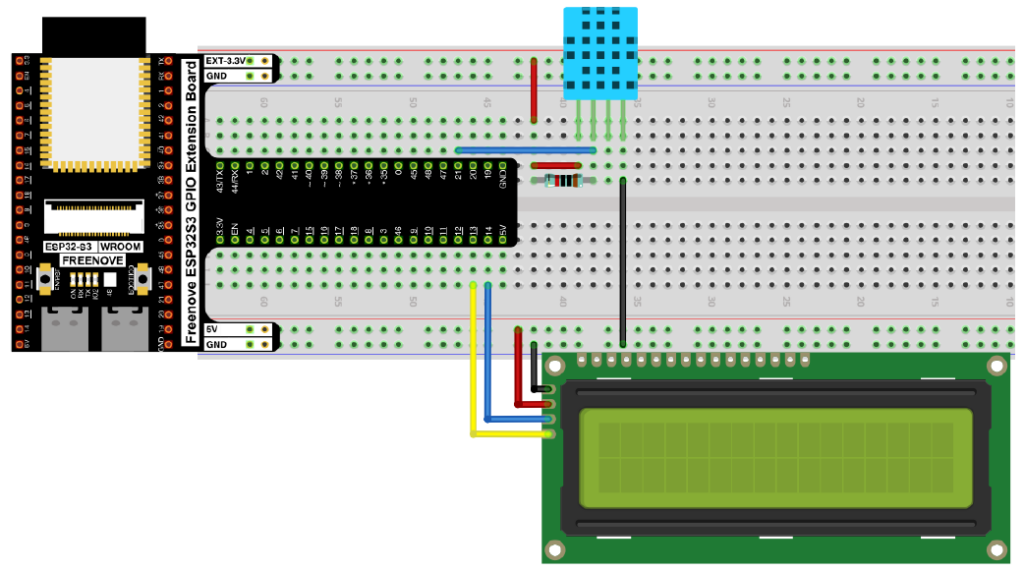
接続図
コード
さて、今回は応用編ですのでまずは自分でコードを書いてみましょう。
参考にするのはLCDディスプレイのプロジェクトと前回のプロジェクトです。
コードはコピペしていただいて大丈夫です。
非営利団体 金重総合研究所 - 知...
Project 20.1 LCDディスプレイ/LCD1602 - 非営利団体 金重総合研究所
前回はステッピングモーターの制御について学びました。 今回はLCDディスプレイに文字を表示してみましょう。 I
非営利団体 金重総合研究所 - 知...
Project 24.1 温湿度計/Hygrothermograph - 非営利団体 金重総合研究所
前回は赤外線リモコンでLEDの明るさを制御してみました。 湿度計は、私たちの生活の中で温度と湿度を測定する重要
解答例
/**********************************************************************
  Filename    : Temperature and Humidity Sensor
  Description : Use DHT11 to measure temperature and humidity.Print the result to the LCD1602.
  Auther      : www.freenove.com
  Modification: 2022/10/26
**********************************************************************/
#include <Wire.h>
#include <LiquidCrystal_I2C.h>
#include "DHTesp.h"

#define SDA 14                    //Define SDA pins
#define SCL 13                    //Define SCL pins

DHTesp dht;                       // create dht object
LiquidCrystal_I2C lcd(0x27,16,2); //initialize the LCD
int dhtPin = 21;                  // the number of the DHT11 sensor pin

void setup() {
  Wire.begin(SDA, SCL);           // attach the IIC pin
  if (!i2CAddrTest(0x27)) {
    lcd = LiquidCrystal_I2C(0x3F, 16, 2);
  }
  lcd.init();                     // LCD driver initialization
  lcd.backlight();                // Open the backlight
  dht.setup(dhtPin, DHTesp::DHT11); //attach the dht pin and initialize it
}

void loop() {
  // read DHT11 data and save it
  flag:TempAndHumidity DHT = dht.getTempAndHumidity();
  if (dht.getStatus() != 0) {       //Determine if the read is successful, and if it fails, go back to flag and re-read the data
    goto flag;
  }
  lcd.setCursor(0, 0);              //set the cursor to column 0, line 1
  lcd.print("Temperature:");        //display the Humidity on the LCD1602
  lcd.print(DHT.temperature);
  lcd.setCursor(0, 1);              //set the cursor to column 0, line 0
  lcd.print("Humidity   :");        //display the Humidity on the LCD1602
  lcd.print(DHT.humidity);
  delay(2000);
}

bool i2CAddrTest(uint8_t addr) {
  Wire.begin();
  Wire.beginTransmission(addr);
  if (Wire.endTransmission() == 0) {
    return true;
  }
  return false;
}
さほど難易度は高くなかったのではないでしょうか?コードはコピペして良いと書きましたが、以前もお伝えした通り、サンプルコードというのは今の時代は五万と出てきます。その中で自分の使いたい箇所を適切に取り出して組み立てる能力がとても大事です。コードの書き方やライブラリの使い方を暗記するのはあまり意味がありません。もちろんソースコードのライセンスを気にする必要がありますが、大体の場合は公開されているものであれば問題ないと考えて良いです。マクロな視点で組み立てる能力を養っていきましょう!
次回は人感センサーの使用方法について学びましょう!
非営利団体 金重総合研究所 - 知...
Project 25.1 人感センサー/Infrared Motion Detector with LED Indicator - 非営利団体 金重総合研究所
前回は温湿度センサーの値をLCDディスプレイに表示してみました。 今回は人感センサーを使用してみましょう。 人

コメント