前回は人感センサーについて学びました。
今回は3軸ジャイロセンサーについて学びましょう。
MPU6050について
MPU6050センサーモジュールは、6軸モーションキャプチャー機能を持つ集積型デバイスです。3軸ジャイロスコープ、3軸加速度センサー、そしてDMP (Digital Motion Processor)を小さなパッケージ内に搭載しています。MPU6050の加速度センサーとジャイロスコープの設定は変更可能です。また、温度によるデータ誤差を補正するための高精度・広範囲のデジタル温度センサーも内蔵されており、温度値を読むこともできます。MPU6050モジュールはI2C通信プロトコルを採用し、デフォルトの通信アドレスは0x68です。
MPU6050は、車両、ロボット、航空機、携帯電話など、安定性や姿勢制御が必要な製品で広く使用されています。

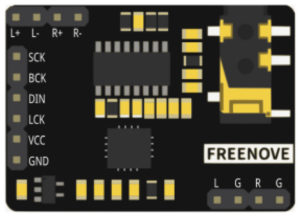
各ポートは以下のようになっています

より詳細な情報はデータシートを確認しましょう。
回路図

接続図

ライブラリのインストール
以下のライブラリをインストールしましょう。
ライブラリ:MPU6050_tockn

コード
/**********************************************************************
  Filename    : Acceleration detection
  Description : Read the MPU6050 data and print it out through the serial port
  Auther      : www.freenove.com
  Modification: 2022/10/26
**********************************************************************/
#include <MPU6050_tockn.h>
#include <Wire.h>

#define SDA 13
#define SCL 14

MPU6050 mpu6050(Wire);//Attach the IIC
int16_t ax,ay,az;//define acceleration values of 3 axes
int16_t gx,gy,gz;//define variables to save the values in 3 axes of gyroscope

long timer = 0;

void setup() {
  Serial.begin(115200);
  Wire.begin(SDA, SCL);          //attach the IIC pin
  mpu6050.begin();               //initialize the MPU6050
  mpu6050.calcGyroOffsets(true); //get the offsets value
}

void loop() {
  if(millis() - timer > 1000){   //each second printf the data
    mpu6050.update();            //update the MPU6050
    getMotion6();                //gain the values of Acceleration and Gyroscope value
    Serial.print("\na/g:\t");
    Serial.print(ax); Serial.print("\t");
    Serial.print(ay); Serial.print("\t");
    Serial.print(az); Serial.print("\t");
    Serial.print(gx); Serial.print("\t\t");
    Serial.print(gy); Serial.print("\t\t");
    Serial.println(gz);
    Serial.print("a/g:\t");
    Serial.print((float)ax / 16384); Serial.print("g\t");
    Serial.print((float)ay / 16384); Serial.print("g\t");
    Serial.print((float)az / 16384); Serial.print("g\t");
    Serial.print((float)gx / 131); Serial.print("d/s \t");
    Serial.print((float)gy / 131); Serial.print("d/s \t");
    Serial.print((float)gz / 131); Serial.print("d/s \n");
    timer = millis();
  }
}
void getMotion6(void){
  ax=mpu6050.getRawAccX();//gain the values of X axis acceleration raw data
  ay=mpu6050.getRawAccY();//gain the values of Y axis acceleration raw data
  az=mpu6050.getRawAccZ();//gain the values of Z axis acceleration raw data
  gx=mpu6050.getRawGyroX();//gain the values of X axis Gyroscope raw data
  gy=mpu6050.getRawGyroX();//gain the values of Y axis Gyroscope raw data
  gz=mpu6050.getRawGyroX();//gain the values of Z axis Gyroscope raw data
}
今回は27行目と44行目に注目してみましょう。過去にも出てきた書き方ですが、44行目で今の時刻を取得しています。そこからメインループをグルグルと回していくのですが、前回に画面出力した時(timer)から1000ms経過していたらif文の中身の値の取得からシリアルモニターへの出力までを実行しています。1000ms経過していなければ何もせずにグルグル回るだけです。この書き方の何がいいかというと、delayだと全ての処理が止まってしまいますが、この書き方だと複数の処理をそれぞれ別の間隔で回すことができるというところが良いところです。擬似的なマルチスレッド処理ができるということですね。
次回はBluetoothによるデータ通信を試してみましょう!


コメント